Alexa Custom Skill Account Linking with .NET and Testing

This article expects you to have a basic understanding of the Alexa Custom Skill and how to build a sample skill. If not, no worries. Just jump to my other blog to get started with Alexa Custom Skill - link below.
Build your first Alexa skill with Alexa.NET and Azure FunctionsNow let’s get to the next level, Account Linking. Amazon defines Account Linking as
Account linking enables your skill to connect the skill user’s Amazon identity with their identity in a different system.
Let’s decode it. Some skills require the ability to connect the identity of an Alexa end user with a user in another system. If you are developing a custom skill for a business through which you are looking to provide your services, then you need the ability to authenticate and identify the user requesting the service. This is achieved through the “Account Linking” mechanism.
Amazon has provided a lot of documentation on how to do an Alexa Skill (custom skill) Authentication using Account Linking, but I could not find any code or project examples, especially in .NET. Also, there isn’t enough info on how to test it. So I decided to put one here.
What, Why, and How of Account Linking
During the user interaction, the back end (web service) can identify the user and access all user-related data to provide a personalized experience. Based on what level of user experience and user data are needed, you choose one of below three options.
- UserId — Every response you get from the Alexa service contains userId. You can use userId as a key for your database and keep track of what is being happened with the user.
- Customer Profile API — sometimes you need more than just userID like their name, email and phone number. These details are passed in every Alexa request after user consent.
- Account Linking — If you are looking for more than what Customer Profile API provides, then use your account linking system. Let’s say you want to provide a food delivery experience, you need the user to deliver an address, payment method etc… In this case your account linking system.
In very simple terms, Account Linking will be initiated from Alexa mobile/web app. Through the Alexa mobile/web app, locate your skill, and navigate to its settings. There you will see “Link your account” (this is visible only when your custom model is enabled to support it). This link will take the user to the Authorization server where the user will be authenticated and redirected back to the successful account linking page.
When the user is authenticated, the Authorization server will redirect the user to Alexa call-back URL with a token. This token will be stored on Alexa could service. Now every time you ask Alexa something, the back end receives this token. Back-end service will identify user with tokens and provide a personalized experience.
Account Linking is done through the OAuth protocol and it supports two authorization grant types
- Authorization Code Grant
- Implicit Grant
The primary difference between these two types is in how the access token is obtained from the authorization server.
- In an implicit grant, the authentication server returns the access token after the user logs in during the account linking process.
- In an authorization code grant, the authentication server returns an authorization code after the user logs in during the account linking process. Alexa then uses this code to request an access token/refresh token pair from the authorization server. Alexa can then use the refresh token to request a new access token/refresh token pair after the old token expires.
This example below demonstrates an Implicit code grant as it is easy to use, but the authorization code grant type is the more secure, robust solution and it should be used if possible.
STEP 1: Create a simple custom skill with .NET Azure functions
Simply follow my previous post below and create a simple custom skill and keep it ready.
STEP 2: Build Authorization Server
I will use the ASP.NET Core Razor app to build a simple login page. This will authenticate the user and generate a token and pass it as part of the reply URL. Alexa service read the token from the reply URL and links the user account to the skill.
Here is the source of the Authorization Server —download here
Below is the code to authenticate the user on login and how to form a reply URL. We need to send the state and access token in the reply URL.
The access token is mapped to the user and acts as a key to retrieve user details.
 public IActionResult OnPost()
  {
      var request = HttpContext.Request;
      if (!ModelState.IsValid)
      {
          return Page();
      }

      //https://pitangui.amazon.com/spa/skill/account-linking-status.html?vendorId=M2AAAAAAAAAAAA#state=xyz&access_token=2YotnFZFEjr1zCsicMWpAA&token_type=Bearer

      var url = request.Query["redirect_uri"] + "#state=" + request.Query["state"] + "&access_token=2YotnFZFEjr1zCsicMWpAA&token_type=Bearer";
      return Redirect(url);
  }
Run the application locally and expose the local port with ngrok so it can be publicly accessible. This will be a publicly accessible Authorization server URL which will be configured in Custom Model.
STEP 3: Configure your Custom Model
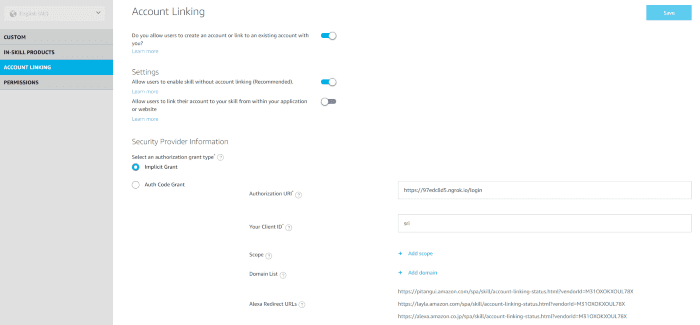
In Custom Model locate Account Linking on the left panel and set the below values.
- Enable account linking
- Select Implicit Grant
- Set Authorization URI ( prepared in STEP 2)
- Save and Build your custom Model

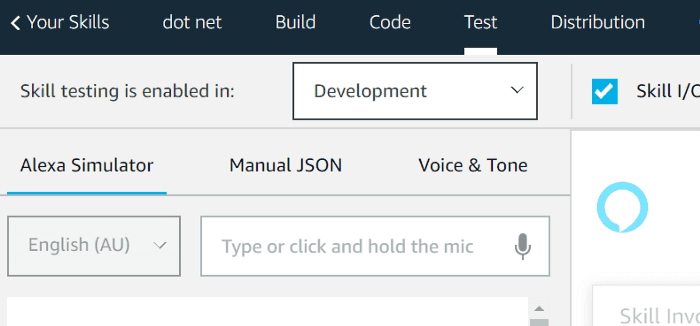
Navigate to the test console and enable Skill testing to Development. Without this, you won’t see your skill in the Alexa web/mobile app

STEP 4: Testing
- Login into the Alexa web/Mobile app. Under your skill → Dev Skill, you can find custom skills. You can also see the Account linking available text in yellow.

- Click on your skill to navigate to skill settings.

- Click on Link Account. It will take you to your Authorization server page. After a successful login, the user is redirected to Amazon reply URL where it confirms successful account Linking.
On successful authentication, Alexa receives a token. This token will be persisted and it will never expire as we are using an implicit grant. Now, every request to the back end includes a token. On back-end service, based on token identify the user and customize the user experience. When a skill is enabled without account linking, the Alexa service doesn’t pass any token to recognize the user.
- Retrieve token in Azure function.
SkillRequest.Context.System.User.AccessToken
Newsletter
Related Posts
Legal Stuff

